Common Courtesy and Important Nuances of Scripting.
We have already written the first scripts for Illustrator with you. Now let’s do it correctly ☺
When scripts are launched in Illustrator sometimes there is this error:
An Illustrator error occurred: 1346458189 (“PARM”)
And it’s rather difficult to understand the reason why it has emerged. The code has been written correctly, everything is correct, but the error emerges. When you launch the script or Illustrator one more time though, it’s possible that this error won’t emerge again…
In the Illustrator manual it’s written that this error can happen when the same script is launched in Illustrator many times and the work with variables has been done badly. If we haven’t cleaned the variable after a script has been finished, then it retains its old value and it can lead to such unintelligible glitch.
Developers of Illustrator recommend indicating all the variables inside the function in order to avoid this problem. Then after the function has been finished all the variables will reset automatically. If we take into consideration Hello World again, it should look like this:
 //We create a function, and do all the work with variables inside it.
 function main () {
   //Hello World!
   var myDocument = app.documents.add();
   //We create a new text frame and assign it to the variable  "myTextFrame"
   var myTextFrame = myDocument.textFrames.add();
   // We set the text in the frame and set its position
   myTextFrame.position = [200,200];
   myTextFrame.contents = "Hello World!"
   }
 //We call this function to make it launch and do all the work
 main();
I highly recommend you to get used to writing scripts in this way at once in order to avoid rewriting huge scripts later in case there is some glitch. I will write further scripts in the lessons without enveloping them in the main function though for simplifying.
Creating Objects Like PathItem.
We can consider a contour or path to be the main object in Illustrator, it’s called PathItem in script terminology. Paths are kept in the pathitems array inside a document, layer or group. To make a path, one has to turn to this array. Let’s have a close look at the example which shows work with paths:
var doc = app.activeDocument;
//a thick stroke and filling while creating new objects
doc.defaultStroked = true;
doc.defaultFilled = true;
doc.defaultStrokeWidth = 10;

//We create a rectangle (Y of the upper left corner,X, width, height, reversed)
//If reversed = false, then the order of dots is clockwise, if true - then counterclock-wise
var rect = doc.pathItems.rectangle( 762.5, 87.5, 425.0, 75.0 ,false );

//A rectangle with rounded corners (Y of the upper left corner,X, width, height, horizontal radius, vertical radius)
var rndRect = doc.pathItems.roundedRectangle(637.5, 87.5, 425.0, 75.0, 20.0, 10.0 );

// Ellipse (Y of the upper left corner,X, width, height, reversed, inscribed)
// If inscribed - false , then the ellipse will make the rectangle described by the first four coordinates,
// If inscribed - true , then the ellipse will be set in this very rectangle
var ellipse = doc.pathItems.ellipse(512.5, 87.5, 425.0, 75.0, false, false );

// To create a polygon (centerX, centerY, radius, quantity of sides)
var octagon = doc.pathItems.polygon( 300.0, 325.0, 75.0, 8 );

// To create a star (centerX, centerY, outer radius, inner radius, quantity of ends)
var star = doc.pathItems.star( 300.0, 125.0, 100.0, 20.0, 5 );

// Now we’ll create a line out of two dots var line = doc.pathItems.add();
line.setEntirePath( Array( Array(20, 475), Array(175, 300) ) );
// We’ll add one more dot to the line var newPoint = line.pathPoints.add();
newPoint.anchor = Array(20, 300);
//We’ll set the coordinates of the left direction point in order to get an arc segment
newPoint.leftDirection = Array(10,200);
newPoint.rightDirection = newPoint.anchor;
Launch the script and make some experiments. Figure it out, what each coordinate is necessary for and how it influences the script.
Work with Coordinates.
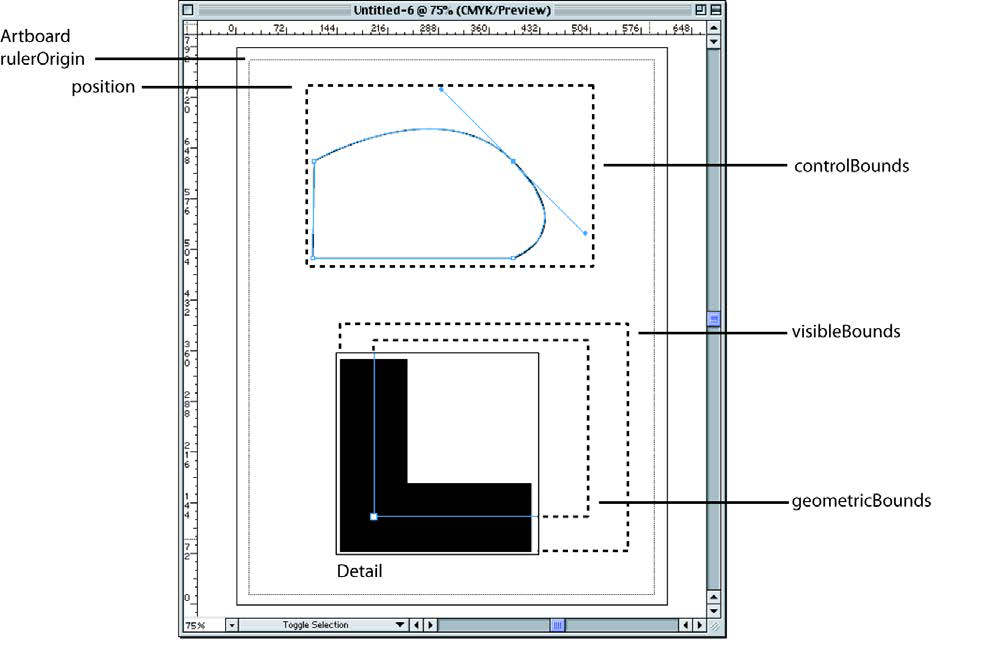
In Illustrator there is a two-dimensional coordinate system. Every object has a position characteristic. X and Y coordinates are written in it; they show the left upper corner of the object boundary. You can check the coordinates in the Info panel, when the object is selected in Illustrator.
Every object has three triangles which describe the sizes of the contents of the object.
- Geometric bounds (geometricBounds) are a rectangle in which the whole object is located for the exception of its stroking.
- Visible bounds (visibleBounds) contain the object with all its stroking.
- Control bounds (controlBounds) contain all the dots of the object with dots which direct arcs. The left upper corner of these bounds corresponds to the dot position of the object.
 Work with Artboards.
Artboards (installation areas) are located in the array Document.artboards
The number of the current artboard can be got if the function is called in Document.artboards.getActiveArtboardIndex()
The data on the size and location of the artboard is in Artboard.artboardRect. Data are given as the array of four coordinates. The first two coordinates show the left upper corner of the artboard, the last two ones show the right lower corner.
There is an important detail which one needs to keep in mind while working with artboards. When we set coordinates in Illustrator, then value of the coordinate Y will increase from top to bottom. But when we turn to the created artboard using a script, then value of the coordinate will increase from bottom to top.
Let’s have a look at the artboard created in Illustrator with the following parameters:
 x: 320
 y: 300
 width: 200
 height:  100
 (coordinates x and y are indicated for the left upper corner)
In the script it will be indicated by the array of the coordinates:
 x1 : 320
 y1 : -300
 x2 : 520
 y2 : -400
Practice – Script for Patterns.
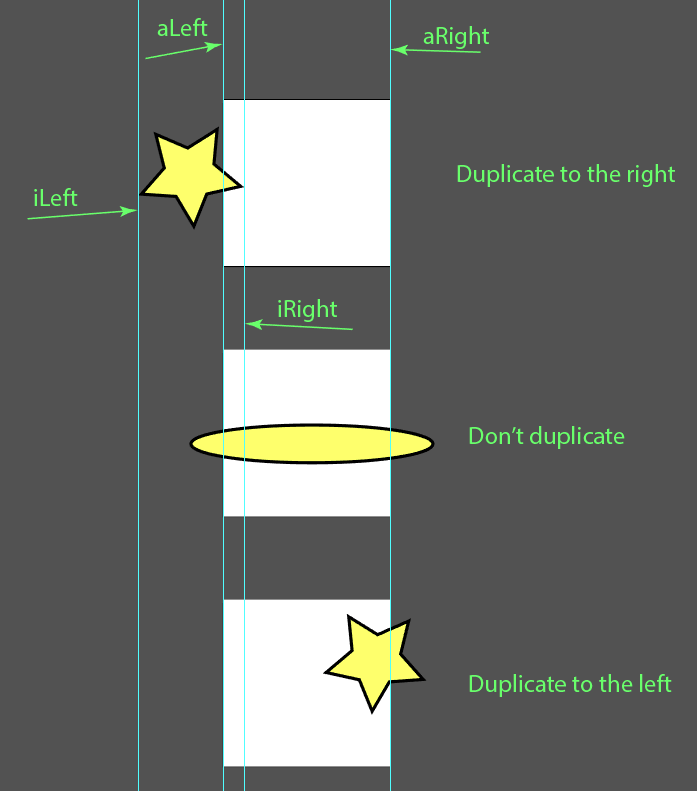
But enough theory, let’s move on creating something interesting ☺ We’ll create a useful script which will duplicate the selected objects on the other side, the objects are located on the bounds of the active artboard. It will allow us to make a seamless pattern.
It’s necessary to understand what conditions are necessary for duplicating the object and to which side it should be done. Let’s draw examples horizontally.
And now let’s create the script ☺
function main () {
  var doc = app.activeDocument;
  //We get sizes of the artboard
  var aIndex = doc.artboards.getActiveArtboardIndex();
  var artboard = doc.artboards[aIndex];
  var aRect = artboard.artboardRect;
  //We save them into separate variables for convenience
  var aLeft = aRect[0];
  var aRight = aRect[2];
  var aTop = aRect[1];
  var aBottom = aRect[3];
  var aWidth = aRight - aLeft;
  var aHeight = aTop - aBottom;
  //The selected objects are located in the array doc.selection, it’s necessary to copy them into a separate array, otherwise when you copy the array with stroking will get damaged
  var sel = [];
  for (var i = 0 ; i < doc.selection.length; i++) {
    sel.push(doc.selection[i]);
    }
  for (var i = 0 ; i < sel.length; i++) {
    var item = sel[i];
    //We work with visible bounds in order to make the object get copied too, if stroking crosses the bound of the artboard
    var iBounds = item.visibleBounds;
    var iLeft = iBounds[0];
    var iRight = iBounds[2];
    var iTop = iBounds[1];
    var iBottom = iBounds[3];
    var copyItem = undefined;
    var copyItem2 = undefined;

    //If the object crosses only the left bound of the artboard
    if ((iLeft < aLeft) && (iRight > aLeft) && (iRight < aRight)) {
      copyItem = item.duplicate(item, ElementPlacement.PLACEAFTER);
      copyItem.translate(aWidth,0);
      }

    //If the object crosses only the right bound of the artboard
    if ((iLeft > aLeft) && (iLeft < aRight) && (iRight > aRight)) {
      copyItem = item.duplicate(item, ElementPlacement.PLACEAFTER);
      copyItem.translate(-aWidth,0);
      }

    //If the object crosses only the bottom line of the artboard
    if ((iBottom < aBottom) && (iTop > aBottom) && (iTop < aTop)) {
      copyItem2 = item.duplicate(item, ElementPlacement.PLACEAFTER);
      copyItem2.translate(0,aHeight);
      //If we have made the copy horizontally, it should be duplicated vertically too
      if (copyItem !== undefined) {
        copyItem3 = copyItem.duplicate(copyItem, ElementPlacement.PLACEAFTER);
        copyItem3.translate(0,aHeight);
        }
      }

    //If the object crosses only the upper bound of the artboard
    if ((iBottom > aBottom) && (iBottom < aTop) && (iTop > aTop)) {
      copyItem2 = item.duplicate(item, ElementPlacement.PLACEAFTER);
      copyItem2.translate(0,-aHeight);
      if (copyItem !== undefined) {
        copyItem3 = copyItem.duplicate(copyItem, ElementPlacement.PLACEAFTER);
        copyItem3.translate(0,-aHeight);
        }
      }
    }
  }

main ();
Have you already tried it? Does everything work well? And now it’s time for your home task: create the script which copies the selected objects, and while doing so it must copy every object ten times and put it at random locations on the artboard. We should get something like a generator which multiplies objects. Here’s a little tip – you will need the function Math.random().