Extendscript Toolkit Installation
To write scripts you can use any text editor/word processor, it could be even Notepad. As for me, I use the original Extendscript Toolkit (further referred to as ESTK). Its functionality is great as it has all the things necessary for me, for instance, it has a built-in debugger of scripts. Naturally it makes developing new ones much easier. Many professional programmers don’t like it though; they say it’s anfractuous and inconvenient ☺
If you are going to develop scripts in ESTK, first of all, you need to be sure that it has been installed. In Windows one usually finds it in the Start menu in the directory “C:\Program Files (x86)\Adobe”.
In case ESTK instruments haven’t been installed it is better to install them using Adobe Creative Cloud. But it so happened once that a person had a problem with installing ESTK on their computer as it wasn’t in the list of applications. If you face the same difficulty follow the link and install ESTK from the official website:
https://helpx.adobe.com/ru/creative-cloud/kb/creative-cloud-apps-download.html
Not to worry about a thing make sure that you can connect to Adobe Illustrator. It should emerge in the dropdown list as it’s shown in the picture below:

Documentation
Documentation on peculiarities of working in JavaScript under Illustrator can be found here:
https://www.adobe.com/devnet/illustrator/scripting.html
Chiefly, you will need the following documents:
- Adobe Illustrator CC 2017 Scripting Guide gives a basic knowledge on working with Scripts in Illustrator.
- Adobe Illustrator CC 2017 Reference: JavaScript is a list of almost all the objects and methods available in Illustrator with descriptions and a lot of examples.
- Object Model Viewer is located in the menu Help ESTK. Its contents overlap to a considerable extent with the contents of Reference, but some things differ. Some of them can be found only here, others only in Reference.
- JavaScript Tools Guide is located in the menu Help ESTK. It describes the environment of the development. There are many interesting nuances in it. More than that, you will learn here how to work with a file system, to create the user’s windows with buttons and connect external DLL.
- Forum of script developers on the website Adobe:
https://forums.adobe.com/community/illustrator/illustrator_scripting - Examples of scripts in ESTK, which show how to work with the user’s interface. On my computer they are located here:
C:\Program Files (x86)\Adobe\Adobe ExtendScript Toolkit CC\SDK\Samples\javascript - Examples of scripts in Illustrator which show how to work with certain types of objects
C:\Program Files\Adobe\Adobe Illustrator CC 2018\Scripting\Sample Scripts\JavaScript
If you think there could be something more useful, please write about it to me and we will complete the list together ☺
The First Script Hello World
If you have difficulties with the following material I would recommend you this textbook: https://javascript.info/
Written in accessible language, it gives a basic knowledge on programming in JavaScript. Usually this language is used for writing programs on websites which are run inside the user’s browser (for instance, Chrome, Firefox, etc.) Mostly, you are interested in parts “An introduction” and “JavaScript Fundamentals”.
The next example is taken out of the official Scripting Guide and it is good for a beginning.
According to the traditions of programming we will create a script, which writes Hello World on the screen.
//Hello World!
var myDocument = app.documents.add();
//Make a new text frame and assign it to the variable “myTextFrame”
var myTextFrame = myDocument.textFrames.add();
// Install the text in the frame and its location
myTextFrame.position = [200,200];
myTextFrame.contents = "Hello World!"
You can launch a script directly from ESTK (for instance, you can use F5 button or use the menu Debug), you can save the script under a separate name and launch it directly, opening it in Illustrator (for instance, pressing buttons CTRL+F12 or the menu File->Scripts->Other scripts).
Now let’s create a script which will change the color and size of a given inscription.
Steps of creating a script:
- It is necessary to divide the task into a few subtasks. You need to detail each subtask really well, so that every step could be written in only one line.
- Writing the program itself.
Let’s try to do the following:
- Find the current document.
- Find the inscription in it.
- Change the parameters of the inscription.
In order to understand how it can be done, let’s start with the hierarchy of objects in Illustrator.
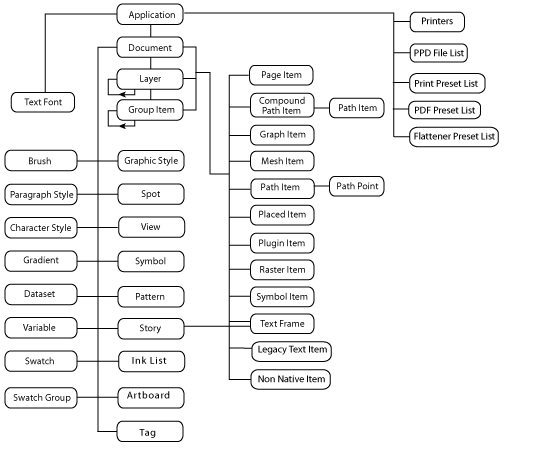
On the top level there is Application. To refer to it you can use the object called app.
All open documents are stored in the array app.documents
You can refer to an active document via app.activeDocument
There are layers inside a document. They are in the array Document.layers
Inside the layers there could be objects of different kinds such as layers, groups, paths, meshes. Objects are grouped arrays according to their type and get corresponding names. Text objects are in the array textFrames
The information about the rest of the types of objects will be available in the ensuing lessons. You can learn them themselves if you read Reference and Scripting Guide.
Every object (path, text, etc.) is located in the array of a corresponding type, and also in the array pageItems
Numbering of the elements in arrays starts with 0.
And now let’s go
//address the current document
var docRef = app.activeDocument;
//address the inscription in the document
var myTextFrame = docRef.textFrames[0];
//Change color
In order to understand how to change a color of objects let’s turn to Reference (part TextFrameltem). If you look through all attributes and objects you might not understand at once where to look for a color of the text. In such cases you can ask somebody for help, find a relevant example on the Adobe forum, or look through all the attributes which relate to the object TextFrameItem in Reference. If you go to the object type TextRange, there you can see the attribute characterAttributes, inside of which there is the attribute fillColor. If you click more links you will find how to create the RGBColor. As a result our code will be this one:
//address the current document
var docRef = app.activeDocument;
//address the inscription in the document
var myTextFrame = docRef.textFrames[0];
//Get the main textRange
var range = myTextFrame.textRange;
//Address attributes of symbols
var attributes = range.characterAttributes;
//Create a new color
var newRGBColor = new RGBColor();
newRGBColor.red = 255;
newRGBColor.green = 255;
newRGBColor.blue = 0;
//Change the color
attributes.fillColor = newRGBColor;
Launch the script and look what you will get as the result.
And now a small home task: create a script which will make three inscriptions with different texts, in different places, in different colors and using different font sizes.
If you have questions or if you have had difficulties with doing the task, write about it in comments. If possible, we will try to help everyone.